华云数据工程师谈2019前端战略规划之人工智能AI
作者: CBISMB
责任编辑: 贾西贝
来源: ISMB
时间: 2019-04-18 09:07
关键字: 华云数据
浏览: 0
点赞: 0
收藏: 0
随着人工智能技能的发展和国务院印发的《新一代人工智能发展规划》,人工智能越来越受到开发者们的关注,从而也导致了各种人工智能的库涌现出来,并且越来越完善强大。
传统意义上Python已经成为了最受欢迎的机器学习语言,近来,Javascript也出现的很多优秀的框架,尽管Javascrpt和Node.js的的性能要比 Python 和 Java 的性能差,但它们已经能够应对机器学习中的许多问题。同时,Web 编程语言也具有很强的易用性,即你只要搞定了 Web 浏览器,那么运行 JavaScript 人工智能项目就不是问题。
华云数据“智汇华云”专栏将为您奉上“2019前端战略规划”系列文章,本期将为您讲解2019前端战略规划之人工智能AI。
能做什么
前端工程在人工智能的团队到底能做什么,体现怎么的价值?从实践看,要完成一个完整的人工智能项目,三种东西是不可或缺的:算法,数据和工程。而前端在这三个方向种,最容易参与进去,同时也最容易做出成绩的地方就是在工程方面。
具体的大致可以分为五块内容:人机交互,数据可视化,产品Web,计算,模型训练和算法执行。对于前三点偏重交互的领域,毋庸置疑用前端做起来驾轻就熟,而后面偏重计算的领域,前端是否合适做,或者说前端该怎么去做是有可以探讨的。
这些年随着HTML技术的普及,浏览器对PC和手机硬件的控制越来越好。在AI的项目中,很多时候需要获取麦克风和摄像头的权限,好实现“听”,“说”,“看”的功能,对于图片的处理,网上也已经有不少用Canvas实现的例子。
相信大家对数据可视化也不会陌生,很容易能联想到阿尔法狗,这些年明显的趋势也是人工智能,比如语音识别、图像识别、人脸识别、指纹识别等,以及现在外面在做的一些数据可视化的内容。
TensorFlow
TensorFlow.js是一个开源的基于硬件加速的JavaScript库,用于训练和部署机器学习模型。
谷歌推出的第一个基于TensorFlow的前端深度学习框架TensorFlow.js 是一个开源的用于开发机器学习项目的 WebGL-accelerated JavaScript 库。
TensorFlow.js 可以为你提供高性能的、易于使用的机器学习构建模块,允许你在浏览器上训练模型,或以推断模式运行预训练的模型。TensorFlow.js 不仅可以提供低级的机器学习构建模块,还可以提供高级的类似 Keras 的 API 来构建神经网络。
优点:
1) 不用安装驱动器和软件,通过链接即可分享程序
2) 网页应用交互性更强
3) 有访问GPS,Camera,Microphone,Accelerator,Gyroscope等传感器的标准api(主要是指手机端)
4) 安全性,因为数据都是保存在客户端的
应用方式:
1) 在浏览器中开发ML
使用简单直观的API从头构建模型,然后使用低级别的JavaScript线性代数库或高层API进行训练。
2) 运行现有模型
使用TensorFlow.js模型转换器在浏览器中运行预训练好的TensorFlow模型。
3) 重新训练现有模型
使用连接到浏览器的传感器数据或其他客户端数据重新训练ML模型。
图形识别:你画我猜
这里演示创建一个简单的工具来识别手绘图像,并且输出当前图像的名称。无需安装任何额外的插件,可直接在浏览器上运行,使用谷歌Colab来训练模型,并使用TensorFlow.js将它部署到浏览器上。
Demo地址:
https://zaidalyafeai.github.io/sketcher/
Code地址:
https://github.com/zaidalyafeai/zaidalyafeai.github.io/tree/master/sketcherher
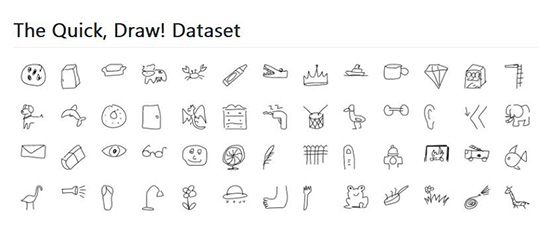
数据集
使用卷积神经网络(CNN)来识别不同类型的手绘图像。
这个卷积神经网络将在QuickDraw数据集
(https://github.com/googlecreativelab/quickdraw-dataset)上接受训练。
该数据集包含 345 个类别的大约 5 千万张手绘图像。
不过,上图是完善版的物联网,代码自然是在GitHub上啦:Lan。作为服务端来说,Node.js的能力已经是经过验证的。而在混合应用上,仍然也可以经受住考验,混合应用在手机上做个图表是轻轻松松的事(只需要获取数据,然后显示)。
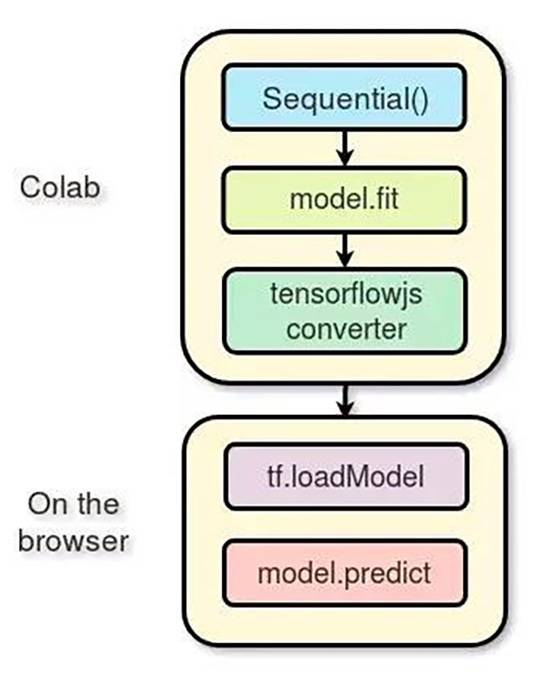
流程
使用Keras框架在谷歌Colab免费提供的GPU上训练模型,然后使用 TensorFlow.js 直直接在浏览器上运行模型。
在TensorFlow.js上有一个教程:
https://medium.com/tensorflow/a-gentle-introduction-to-tensorflow-js-dba2e5257702,
下图为处理流程:
在Colab上进行训练
谷歌 Colab提供了免费的 GPU 处理能力。
阅读下面的教程(https://medium.com/deep-learning-turkey/google-colab-free-gpu-tutorial-e113627b9f5d)了解如何创建 notebook 和开始进行 GPU 编程。
导入
将使用以 TensorFlow 作为后端、Keras 作为前端的编程框架
import os
import glob
import numpy as np
from tensorflow.keras import layers
from tensorflow import keras
import tensorflow as tf
加载数据
首先下载数据集。
import urllib.request
def download():
base ='https://storage.googleapis.com/quickdraw_dataset/full/numpy_bitmap/'
for c inclasses:
cls_url =c.replace('_', '%20')
path =base+cls_url+'.npy'
print(path)
urllib.request.urlretrieve(path, 'data/'+c+'.npy')
加载图像(每个类型5000张), 其中的 20% 作为测试数据。
def load_data(root, vfold_ratio=0.2,max_items_per_class= 5000 ):
all_files =glob.glob(os.path.join(root, '*.npy'))
#initializevariables
x =np.empty([0, 784])
y =np.empty([0])
class_names= []
#load asubset of the data to memory
for idx,file in enumerate(all_files):
data =np.load(file)
data =data[0: max_items_per_class, :]
labels =np.full(data.shape[0], idx)
x =np.concatenate((x, data), axis=0)
y =np.append(y, labels)
class_name, ext = os.path.splitext(os.path.basename(file))
class_names.append(class_name)
data = None
labels =None
#separateinto training and testing
permutation= np.random.permutation(y.shape[0])
x =x[permutation, :]
y =y[permutation]
vfold_size =int(x.shape[0]/100*(vfold_ratio*100))
x_test =x[0:vfold_size, :]
y_test =y[0:vfold_size]
x_train =x[vfold_size:x.shape[0], :]
y_train =y[vfold_size:y.shape[0]]
returnx_train, y_train, x_test, y_test, class_names
数据预处理
对数据进行预处理操作,为训练模型做准备。该模型将使用规模为 [N, 28, 28, 1] 的批处理,并且输出规模为 [N, 100] 的概率。
# Reshape and normalize
x_train =
x_train.reshape(x_train.shape[0],image_size, image_size, 1).astype('float32')
x_test =
x_test.reshape(x_test.shape[0], image_size,image_size, 1).astype('float32')
x_train /= 255.0
x_test /= 255.0
# Convert class vectors to class matrices
y_train = keras.utils.to_categorical(y_train,num_classes)
y_test = keras.utils.to_categorical(y_test,num_classes)
创建模型
创建一个简单的卷积神经网络,模型越简单、参数越少越好。实际上,将把模型转换到浏览器上然后再运行,并希望模型能在预测任务中快速运行。
下面的模型包含 3 个卷积层和 2 个全连接层:
# Define model
model = keras.Sequential()
model.add(layers.Convolution2D(16, (3, 3),
padding='same',
input_shape=x_train.shape[1:], activation='relu'))
model.add(layers.MaxPooling2D(pool_size=(2, 2)))
model.add(layers.Convolution2D(32, (3, 3),padding='same', activation= 'relu'))
model.add(layers.MaxPooling2D(pool_size=(2, 2)))
model.add(layers.Convolution2D(64, (3, 3),padding='same', activation= 'relu'))
model.add(layers.MaxPooling2D(pool_size =(2,2)))
model.add(layers.Flatten())
model.add(layers.Dense(128, activation='relu'))
model.add(layers.Dense(100, activation='softmax'))
# Train model
adam = tf.train.AdamOptimizer()
model.compile(loss='categorical_crossentropy',
optimizer=adam,
metrics=['top_k_categorical_accuracy'])
print(model.summary())
拟合、验证及测试
对模型进行了 5 轮训练,将训练数据分成了 256 批输入模型,并且分离出 10% 作为验证集。
#fit the model
model.fit(x = x_train, y = y_train,
validation_split=0.1,batch_size = 256, verbose=2, epochs=5)
#evaluate on unseen data
score =
model.evaluate(x_test, y_test, verbose=0)
print('Test accuarcy: {:0.2f}%'.format(score[1] *100))
准备WEB格式的模型
在得到满意的模型准确率后,将模型保存下来,以便进行下一步的转换。
model.save(‘keras.h5’)
为转换安装tensorflow.js:
!pip install tensorflow.js
对模型进行转换:
!mkdir model
!tensorflowjs_converter --input_format keras keras.h5model/
通过 zip 将模型进行压缩,以便将其下载到本地机器上:
!zip -r model.zip model
最后下载模型:
from google.colab import files
files.download('model.zip')
加载模型
使用tensorflow.js:
<scriptsrc="https://cdn.jsdelivr.net/npm/@tensorflow/tfjs@latest"></script>
预处理
从画布中获取图像数据:
//the minimum boudning box around the current drawing
const mbb = getMinBox()
//cacluate the dpi of the current window
const dpi = window.devicePixelRatio
//extract the image data
const imgData =
canvas.contextContainer.getImageData(mbb.min.x * dpi, mbb.min.y * dpi,(mbb.max.x - mbb.min.x) * dpi, (mbb.max.y - mbb.min.y) * dpi);
将画布当前的图像数据转化为一个张量,调整大小并进行归一化处理:
function preprocess(imgData){
returntf.tidy(()=>{
//convert the image data to a tensor
lettensor = tf.fromPixels(imgData, numChannels= 1)
//resizeto 28 x 28
constresized = tf.image.resizeBilinear(tensor, [28, 28]).toFloat()
//Normalize the image
constoffset = tf.scalar(255.0);
constnormalized = tf.scalar(1.0).sub(resized.div(offset));
//We adda dimension to get a batch shape
constbatched = normalized.expandDims(0)
returnbatched
})
}
使用 model.predict 进行预测,这将返回一个规模为「N, 100」的概率。
const pred =
model.predict(preprocess(imgData)).dataSync()
提升准确率
模型接受的输入数据是规模为 [N, 28, 28, 1] 的张量。绘图画布的尺寸为 300*300,这可能是两个手绘图像的大小,或者可以在上面绘制一个小图像。最好只裁剪包含当前手绘图像的方框。为了做到这一点,通过找到左上方和右下方的点来提取围绕图像的最小边界框。
//record the current drawing coordinates
function recordCoor(event){
//get currentmouse coordinate
var pointer =canvas.getPointer(event.e);
var posX =pointer.x;
var posY =pointer.y;
//record thepoint if withing the canvas and the mouse is pressed
if(posX >=0&& posY >= 0 && mousePressed)
{
coords.push(pointer)
}
}
//get the best bounding box by finding the top leftand bottom right cornders
function getMinBox(){
var coorX =coords.map(function(p) {return p.x});
var coorY =coords.map(function(p) {return p.y});
//find topleft corner
varmin_coords = {
x :Math.min.apply(null, coorX),
y :Math.min.apply(null, coorY)
}
//find rightbottom corner
varmax_coords = {
x :Math.max.apply(null, coorX),
y :Math.max.apply(null, coorY)
}
return {
min :min_coords,
max :max_coords
}
}


